# Zendesk
Follow the below steps to configure the “Zendesk - Create Ticket” action via webhooks.
## Authenticating Zendesk API
Zendesk's Create API is used here to create tickets in Zendesk for Squadcast Incidents
{% hint style="info" %} **Note****:**
You should be having admin rights in Zendesk to access APIs.
{% endhint %}
The API can be authenticated in two ways.
1. **Email & Password**
* The Email & Password of any user can be used to authenticate the API
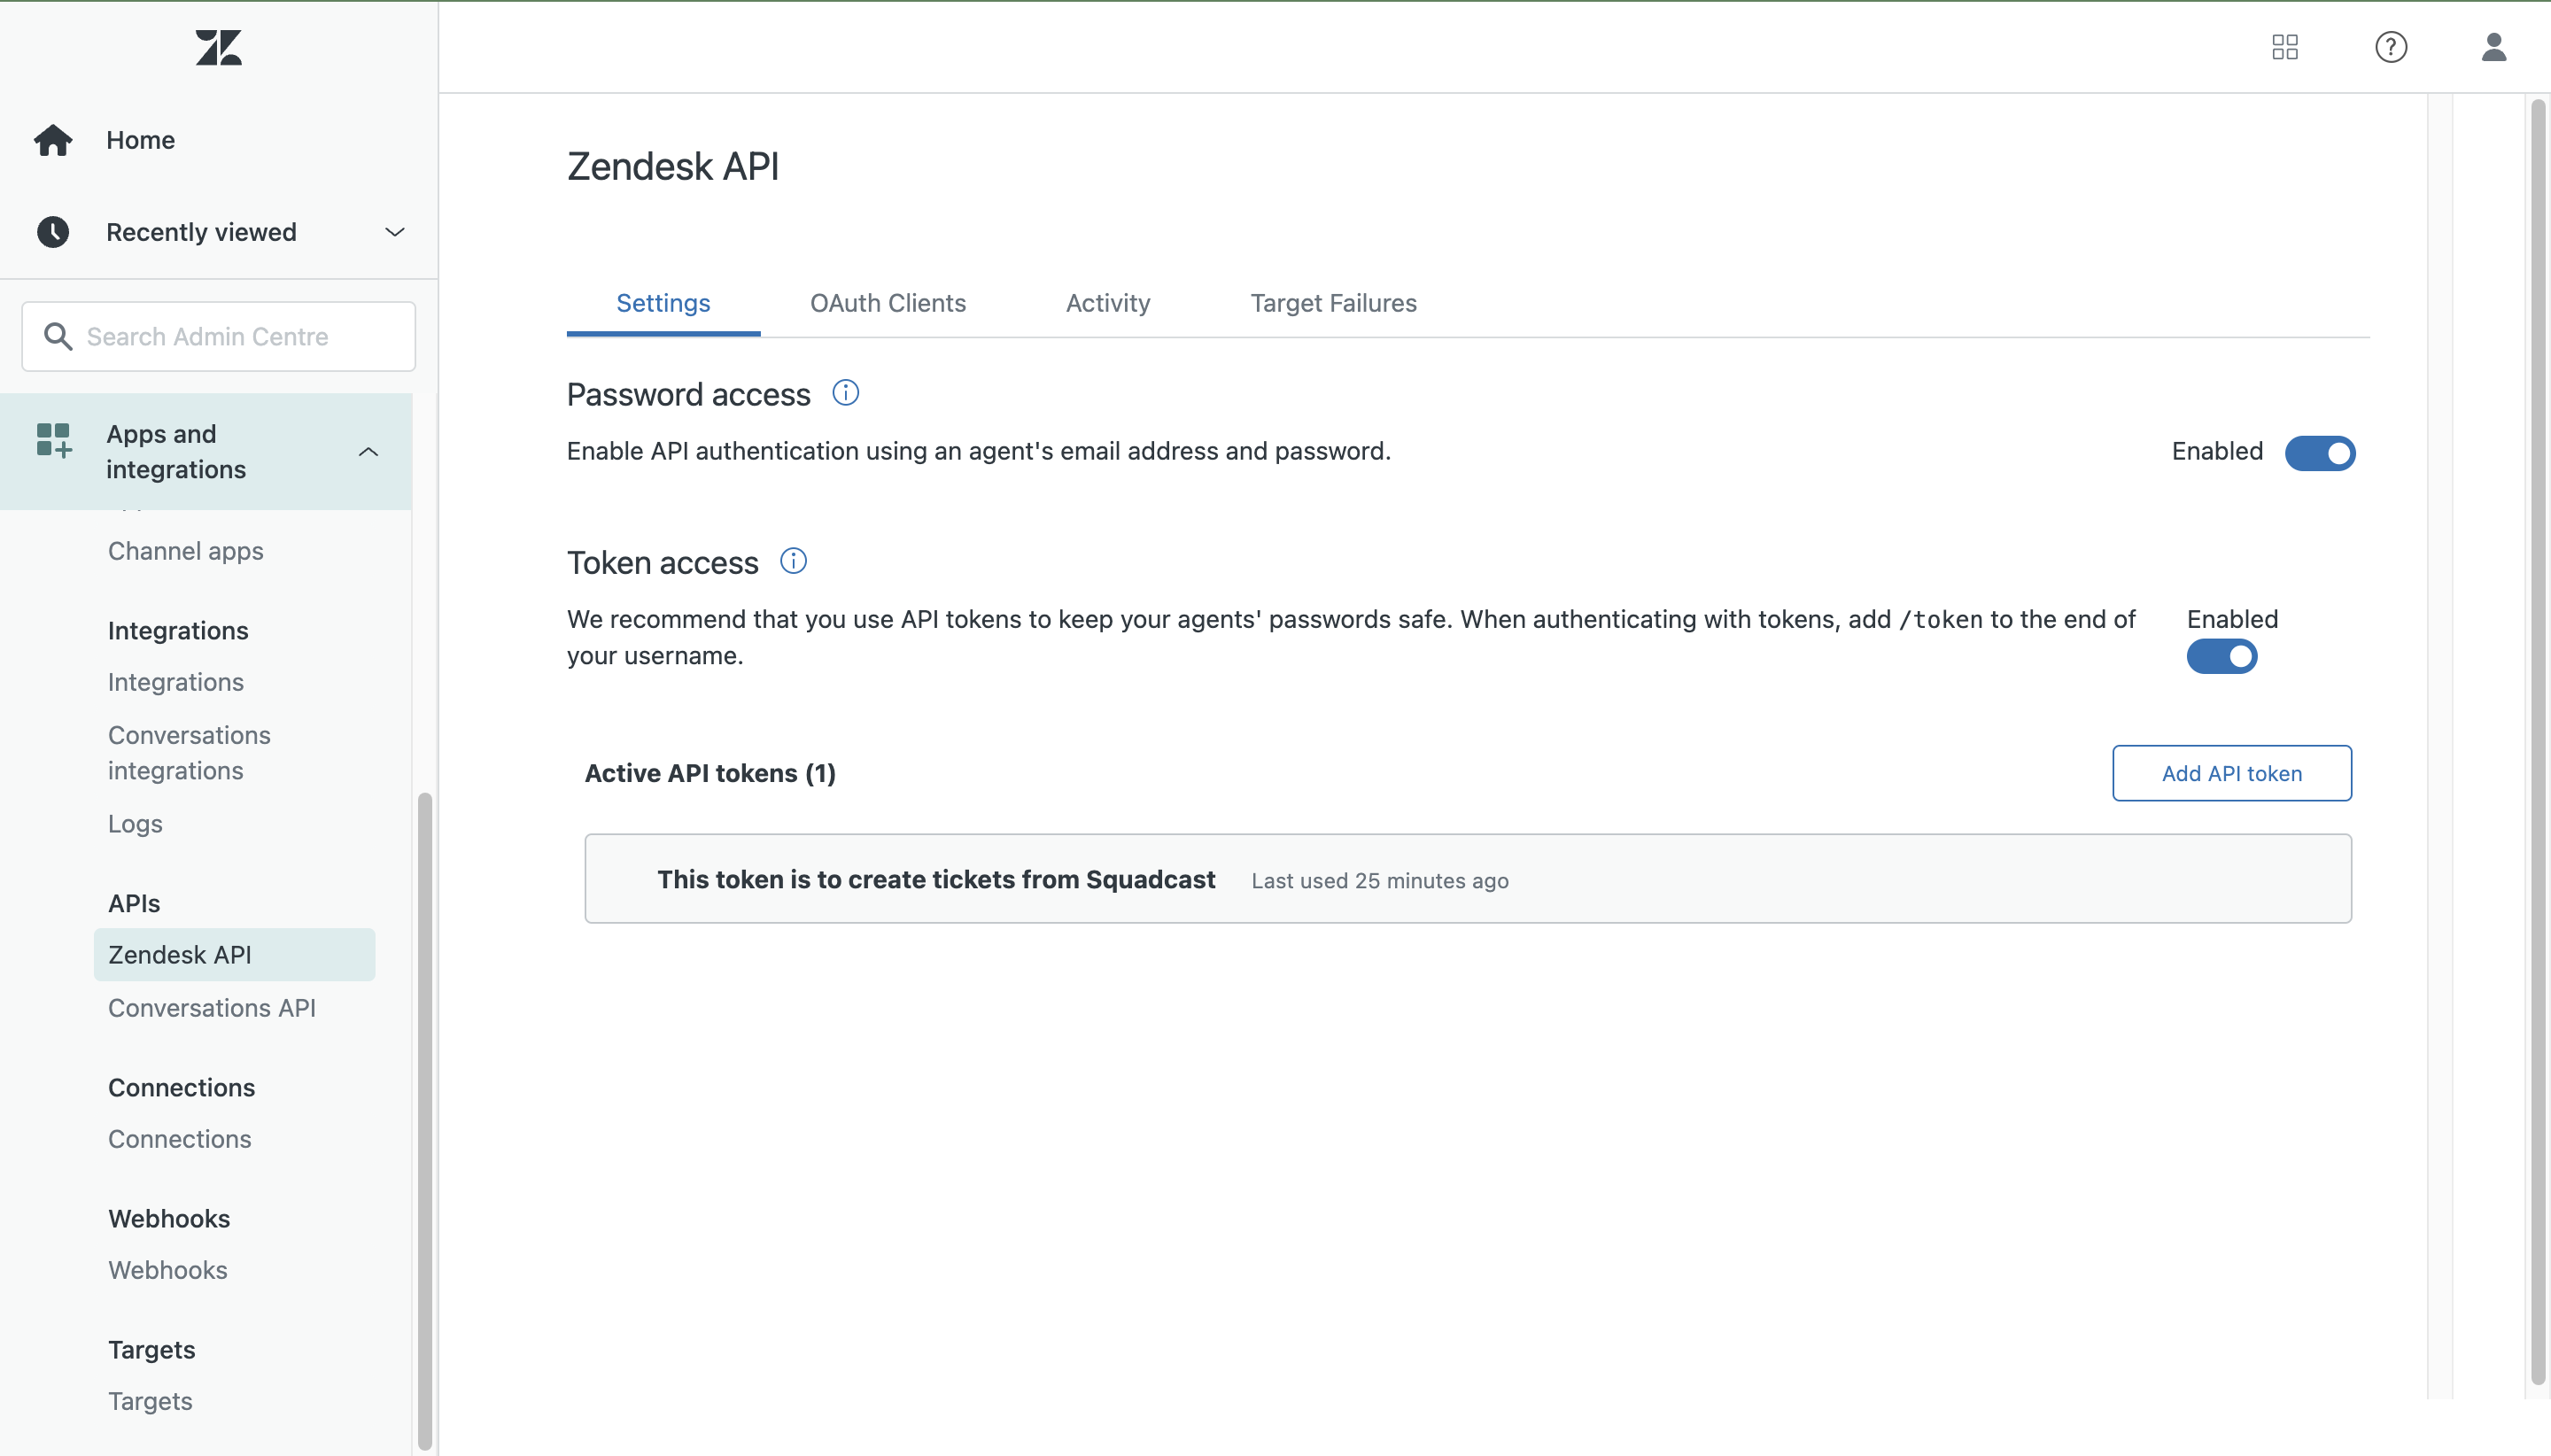
* Log on to **Zendesk Admin Centre** > **Apps & Integrations** > **APIs** > **Zendesk API** > **Enable Password Access**
2. **API Key**
* The API Key and Email of any user can be used to authenticate the API
* Log on to **Zendesk Admin Centre** > **Apps & Integrations** > **APIs** > **Zendesk API** > **Enable Token Access** > **Add API Token > Copy** the token and then click on **Save**
### **Generating Base-64 encoded string**
To authenticate the API Base-64 encoded string has to be generated using the Email/API Key
1. **Email and Password**
* Combine your email address and password with a colon. Example: `jdoe@example.com:pa$$w0rd`.
* Use any tool to generate Base-64 encoded string. Here we are using [https://www.base64encode.org/](https://www.base64encode.org/)
* Base64-encode the resulting string. Example: `amRvZUBleGFtcGxlLmNvbTpwYSQkdzByZA==`
* **Copy** the String
2. **API Key**
* Combine your email address and API token to generate the authorization header. Example: `jdoe@example.com/token:6wiIBWbGkBMo1mRDMuVwkw1EPsNkeUj95PIz2akv`
* Use any tool to generate Base-64 encoded string. Here we are using [https://www.base64encode.org/](https://www.base64encode.org/)
* Base64-encode the resulting string. Example: `amRvZUBleGFtcGxlLmNvbS90b2tlbjo2d2lJQldiR2tCTW8xbVJETXVWd2t3MUVQc05rZVVqOTVQSXoyYWt2=`
* **Copy** the String
## Using Webhooks to create Zendesk tickets for Squadcast Incidents
1. Navigate to **Settings** -> **Webhooks**.
2. Click **Add Webhook**. On the next screen, you will be guided through three steps. Navigate between these steps by clicking on any of the steps on the top bar.
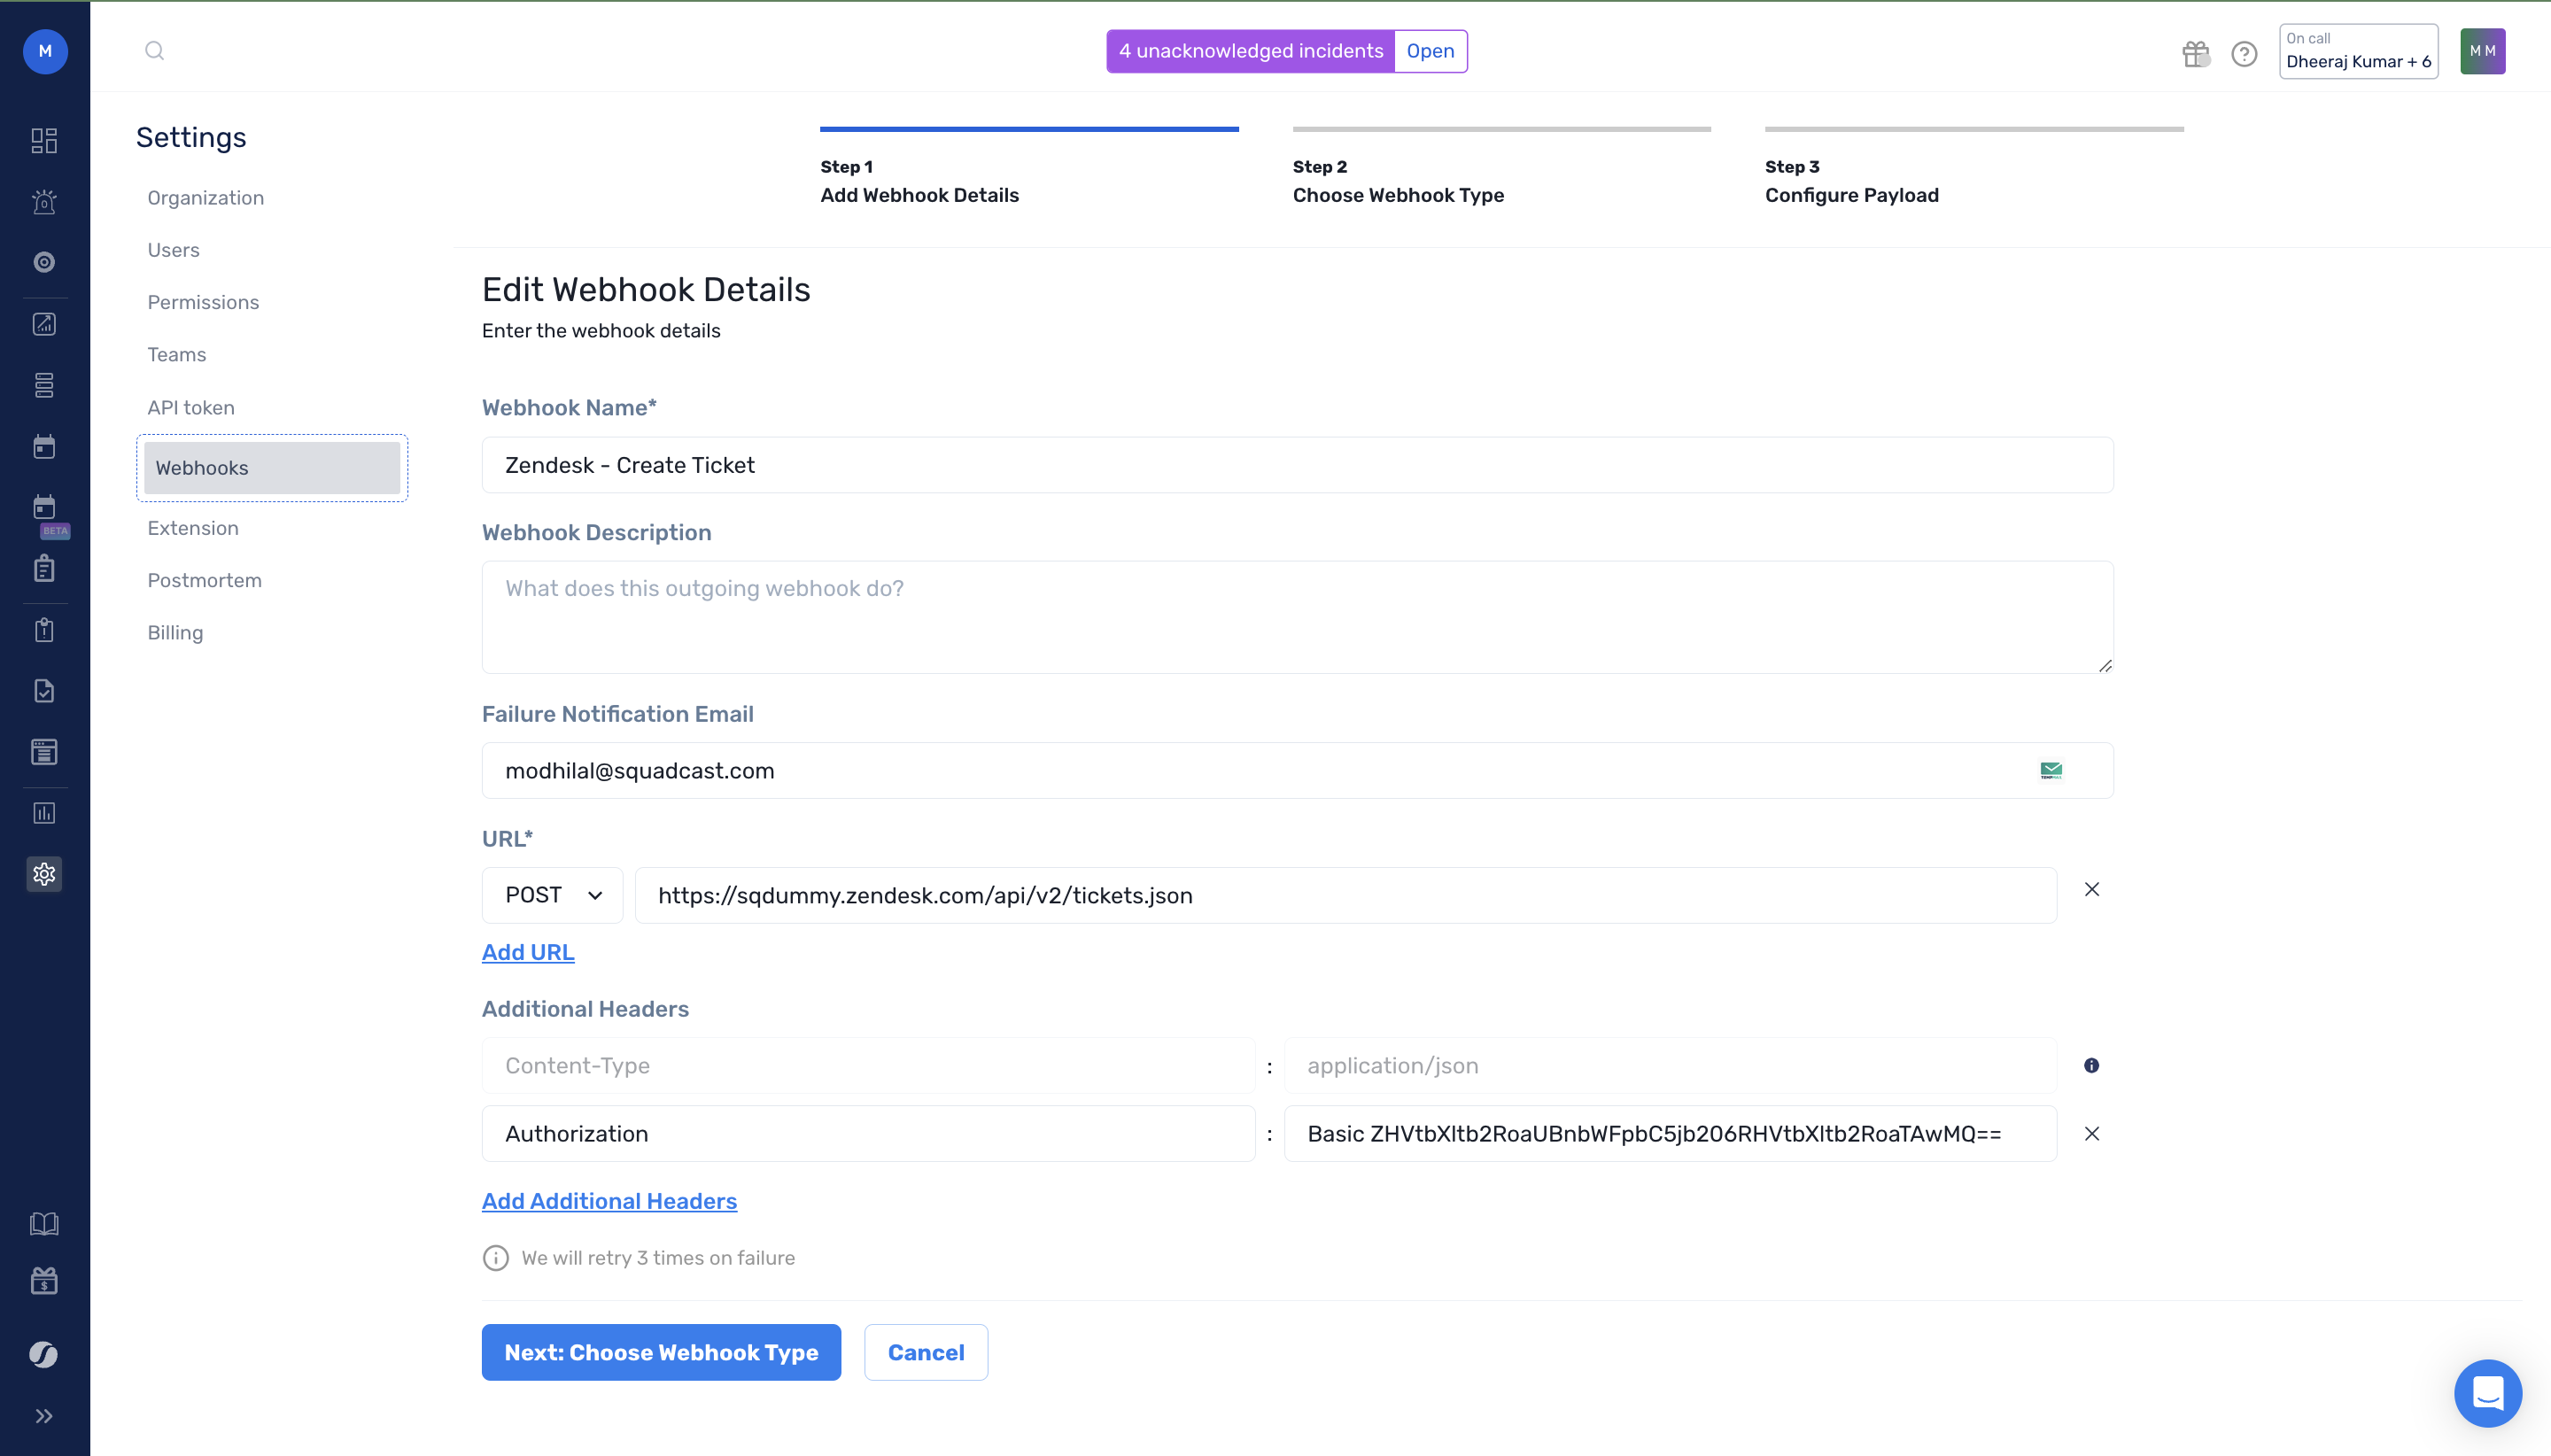
3. **Add Webhook Details**:
1. **Webhook Name**: Enter the webhook name as **Zendesk - Create Ticket**.
2. **Webhook Description** (optional): Enter an optional description. For example - This webhook is for ticket creation in Zendesk for Squadcast Incidents.
3. **Failure Notification Email** (optional): Enter an email where you want to receive failure notifications. This is particularly helpful when you (or an administrator) want to be notified of webhook-related failures.
4. **URL**: Copy and paste the below API.
5. **Additional Headers**: Add `Key: Authorization` and paste the ` Value:`` `` `**`Base-64 encoded string`** copied above with the prefix **Basic**.
[https://domain.zendesk.com/api/v2/tickets.json](https://sqdummy.zendesk.com/api/v2/tickets.json)
{% hint style="info" %} **Note****:**
Replace the word “**domain**” in the URL with your **Domain Name** and make sure you have selected the **POST** request.
Under Additional headers, Content-Type: application/JSON is added by default.
{% endhint %}
Click **Next: Choose Webhook Type**, and navigate to the next step.
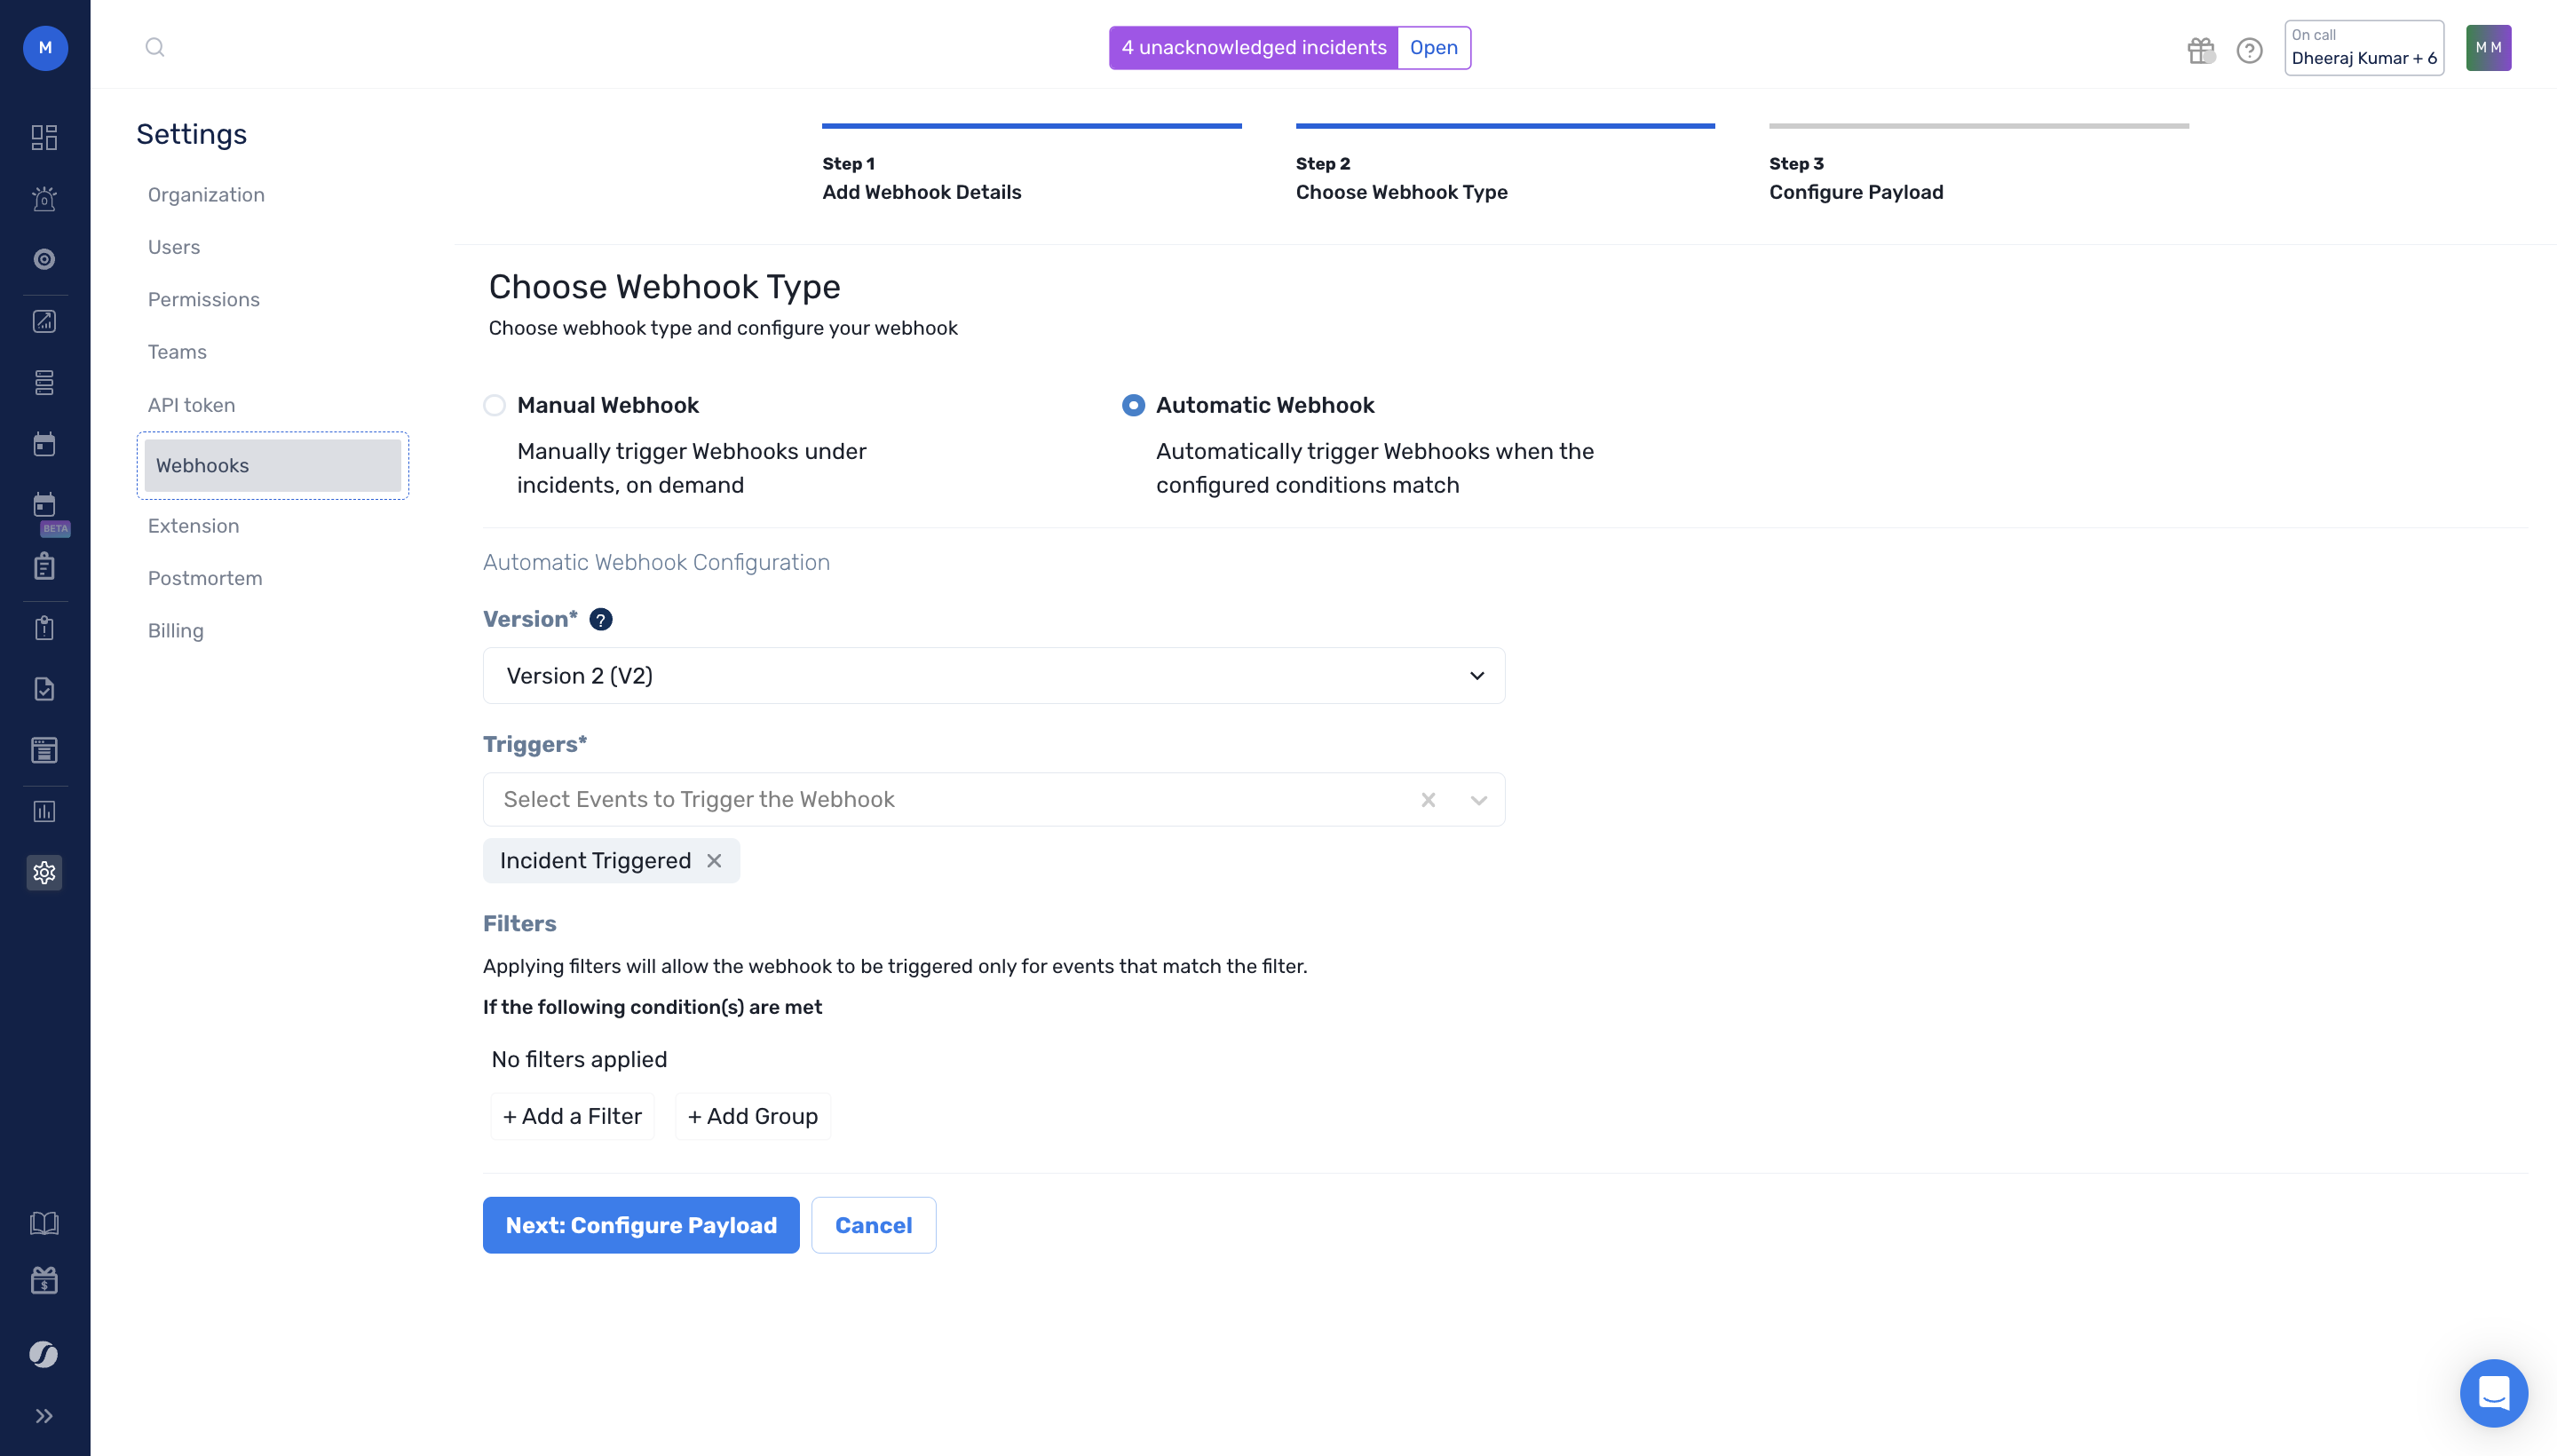
4. **Choose Webhook Type**: Choose Webhook type (Manual or Automatic) and add configurations.
1. **Manual Webhook**: Manually trigger Webhooks under incidents, on demand. Under Manual Webhook, select the teams that are authorized to access the Webhook. You can select All Teams or enter specific Teams, from the drop-down.
{% hint style="info" %} **Note****:**
Select this option only if you want to create Zendesk tickets manually on-demand. If you want a ticket, created automatically when certain conditions are met, please choose Automatic webhooks.
{% endhint %}
2. **Automatic Webhook**: Automatically trigger Webhooks when the configured conditions match. To set up Automatic Webhook Configurations:
1. **Versions**: Select **v2**
2. **Triggers**: Select the following Trigger events (conditions) for which the Webhook will be triggered:
1. Incident Triggered (This will create a Zendesk ticket whenever a new incident gets triggered in Squadcast)
3. **Filters**: You can apply filters on top of events, based on Teams, Services, Alert Sources, and Tags, by having an individual expression or a combination of expressions/expression groups.
Applying filters will trigger the webhook and create Zendesk tickets only for events that match the filter.
Click **Next: Configure Payload**, and navigate to the next step.
5. **Configure Payload**:\
\
Select the pre-configured template for **Zendesk - Create Ticket**. You can also test the Webhook by clicking the **Test Webhook** on the bottom right.
{% hint style="info" %} **Note****:**
We have added the necessary fields in the template. You can change the Priority and Status according to your use case and can add additional ticket fields. You can also [use this link](https://developer.zendesk.com/api-reference/ticketing/tickets/tickets/) to check the fields accepted by Zendesk API.
{% endhint %}
Click **Save** and your **Webhook** is created.
*Have any questions?* [*Ask the community*](https://community.squadcast.com/view/home)*.*
---
# Agent Instructions: Querying This Documentation
If you need additional information that is not directly available in this page, you can query the documentation dynamically by asking a question.
Perform an HTTP GET request on the current page URL with the `ask` query parameter:
```
GET https://support.squadcast.com/integrations/extensions/zendesk.md?ask=
```
The question should be specific, self-contained, and written in natural language.
The response will contain a direct answer to the question and relevant excerpts and sources from the documentation.
Use this mechanism when the answer is not explicitly present in the current page, you need clarification or additional context, or you want to retrieve related documentation sections.